Learning how to draught-proof your home is the closest thing energy saving has to free money. Heated air escapes through gaps around doors, windows, floorboards and letterboxes; cold air pours in to replace it; and your boiler works overtime heating the street. Seal those gaps and the same heating suddenly feels warmer — because it is staying in the house. Best of all, most draught-proofing is cheap, reversible DIY that pays for itself within a single winter.
This room-by-room guide shows you how to find the draughts first (so you fix the ones that matter), then work through doors, windows, chimneys, floors and the small forgotten gaps — with one important safety rule about ventilation at the end.
Step 1: Find the Draughts Before You Fix Them
On a cold, windy day, close all doors and windows and go hunting. The classic detector is a lit incense stick or a candle held near suspect edges — skirting boards, window frames, door edges, keyholes, loft hatches, anywhere pipes and cables enter rooms: the smoke wavers or the flame flickers where air is moving. Your own hand works surprisingly well too; draughts are easiest to feel on the back of a dampened hand. Pay special attention to the gaps you cannot see: under the front and back doors, around the loft hatch, between floorboards in upstairs rooms, behind the bath panel, and at the junction of walls and ceilings in extensions. Make a list room by room — the sealing itself is quick once you know where the weather is getting in.

Room by Room: The Fixes That Matter Most
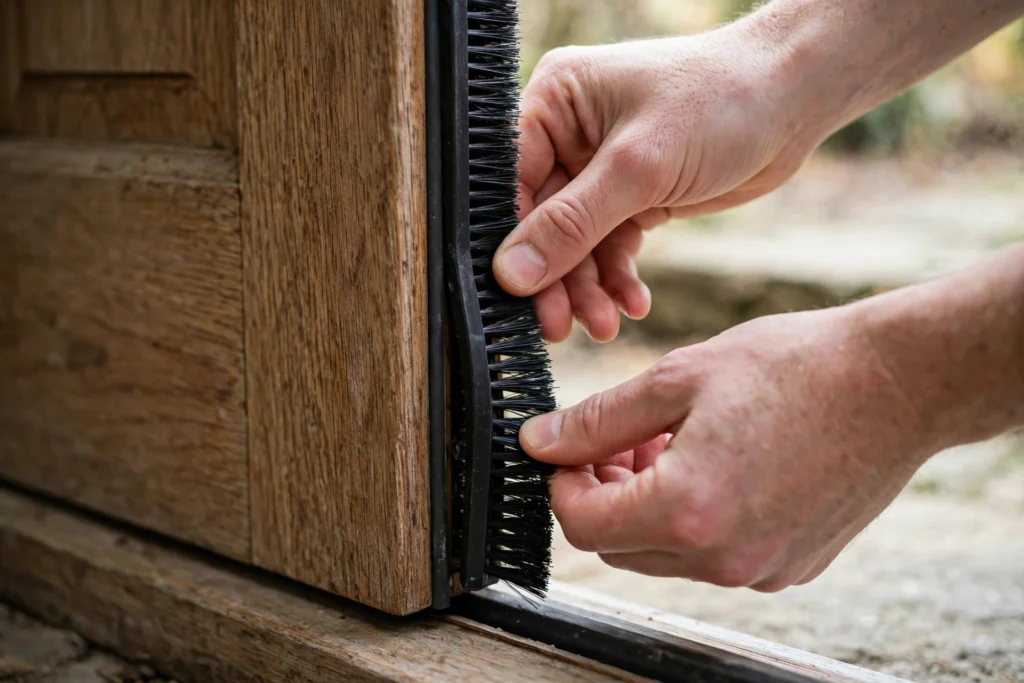
Front and back doors. The single biggest wins in most homes. Fit brush or rubber seals around the frame, a brush strip or hinged flap at the bottom of the door, and a cover for the keyhole and letterbox (a letterbox brush or flap inside cuts a remarkable river of cold air). A door that rattles in its frame is a door that leaks — adjust the latch or add foam tape until it closes snugly.
Windows. Sash windows get brush-pile strips in their runners and a meeting-rail seal; casement windows get self-adhesive foam or rubber strips on the frame where the opener closes against it. Replace cracked putty and perished seals. Secondary glazing — even the magnetic or clip-on DIY kind — cuts window draughts and noise together, and heavy, well-fitted curtains drawn at dusk remain a genuine thermal layer, not just décor.
Living rooms with fireplaces. An open chimney is a purpose-built exhaust for your heating — when the fire is not lit, warm air rises straight out of it. A chimney balloon or a removable chimney draught excluder (with its tag left visibly dangling so nobody lights a fire against it) blocks the flow. Never seal a chimney permanently or block one serving a working fire or boiler flue.
Floors and skirting. Gaps between floorboards can be filled with flexible filler, thin strips or specialist V-shaped seals; a thick rug with underlay does quiet, effective work on the worst of a boarded floor. Seal the gap behind skirting boards with flexible decorator’s caulk — a small tube, a big difference, especially on external walls.
Bathrooms, kitchens and the loft. Seal around pipe entries and the bath panel, fit a cover strip to the loft hatch and foam tape around its frame (the hatch is a chimney in the middle of your ceiling), and check extractor fan outlets have working backdraught shutters.
The Ventilation Rule: Do Not Seal a Home Airtight
One warning that matters more than every tip above: controlled draught-proofing is not the same as sealing a house hermetically. Homes need deliberate ventilation — trickle vents, extractor fans, air bricks — to clear moisture and keep indoor air healthy. Blocking air bricks, sealing trickle vents shut, or draught-proofing a room with an open-flued boiler or gas fire can cause condensation, mould and, in the worst case, dangerous carbon monoxide build-up. The rule is simple: seal the gaps that are accidents; keep the ventilation that is by design. If a room has a fuel-burning appliance, leave its air supply alone entirely and get the appliance serviced instead.
What It Costs and What It Saves
A whole house of DIY draught-proofing typically costs somewhere in the region of £50–£200 in materials — foam tape, brush strips, filler, a chimney balloon — and a weekend of unhurried work. Energy assessors consistently rank it among the fastest-payback measures in the home, commonly recouped within a winter or two in reduced heating bills, with the comfort gain felt on the very first cold evening. Professional fitting costs more but suits large or period homes with many sash windows.
The Bottom Line
Draught-proof your home before winter by hunting the leaks with a flame or incense stick, then sealing them room by room: doors and letterboxes first, windows and chimneys next, floors, skirting and the loft hatch after that — while always leaving designed ventilation untouched. It is a weekend of modest work for a house that feels warmer every day of the heating season.
Frequently Asked Questions
What is the cheapest draught-proofing that works?
Self-adhesive foam tape around door and window frames, a brush strip under the front door, and a letterbox brush. That trio costs very little, fits in an hour or two, and tackles the biggest cold-air routes in most homes.
Will draught-proofing cause condensation?
Only if you block the ventilation that is meant to be there — trickle vents, extractor fans and air bricks. Seal accidental gaps (around frames, boards and hatches) and keep designed ventilation open, and condensation should not increase; moisture-heavy rooms still need their extractor fans used.
How do I draught-proof a chimney I do not use?
Fit a chimney balloon or removable draught excluder just inside the flue, leaving its cord or tag visible as a reminder. Never block a flue serving a working fire or boiler, and do not seal a chimney permanently without ventilation — a capped chimney still needs a vent to stay dry inside.
Is professional draught-proofing worth it?
For most homes, DIY is entirely adequate and much cheaper. Professional fitting earns its money in period properties with many ill-fitting sash windows, where brush-pile systems fitted into routed grooves last for years and preserve the windows’ appearance.